Get Creative with aiTransformer Super Stylizer's Latest ControlNet Options and Samples Gallery
In the Super Stylizer tool, we can stylize an image with images generated from a text prompt (using Stable Diffusion img2img). The resulting images might have the style transferred relatively well, but you have to use a proper style with appropriate style strength, and it's not easy to find a good match. For example, suppose you want to style a portrait of a person with Renaissance art, using a weaker style strength (say 20%) you'll get results resembling the portrait but not much Renaissance style, using a stronger style strength (say 80%) you'll get results in somewhat Renaissance style but very much deviating from the original portrait. In fact, in this case no matter what style strength to use you may never get a realistic looking result, i.e. a portrait looks like a Renaissance painting.
ControlNet is a neural network structure to control diffusion models by adding extra conditions. Recently we integrated ControlNet into Super Stylizer and found that it offers much better control than img2img. Using the same portrait image, if you stylize it with Renaissance art using ControlNet instead of img2img, you can easily generate results containing a person of similar shape and posture but in Renaissance style, i.e. wearing headdress and clothing of that era in a Renaissance environment.
results of ControlNet Canny, Sketch, Depth with the same style strength 50% and seed 543955
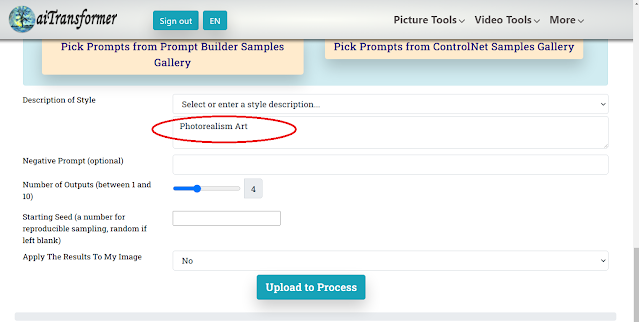
The following screenshot shows the recent addition of three ControlNet options within the "Apply The Results To My Image" dropdown list. Additionally, a new button labeled "Pick Prompts from ControlNet Samples Gallery" has been added, along with a new gallery: the ControlNet Samples Gallery.
What is ControlNet?
ControlNet
is an extended layer of the Stable Diffusion model, a type of neural
network that generates images from text prompts. While Stable Diffusion
uses text prompts as the sole conditioning input, ControlNet extends
this by adding an extra conditioning input to the model.
One of
the most important features of ControlNet is its ability to preserve the
structure and content of the input image while applying the desired
style or effect smoothly. Take this photo as an example,
using different prompts and ControlNet, the result images all keep the main structure and content.
How does it work?
There are many ways to extract the main structure of an image, one classic algorithm is Canny edge detector that identifies outlines of the image. These detected edges are then saved as a control map, and included as an extra conditioning input for the diffusion model, in addition to the text prompt. The process of extracting specific information (in this case, edges) from the input image is referred to as annotation in the research article, or preprocessing in the ControlNet extension. Apart from edge detection, there are other methods of preprocessing images, such as sketch, depth and pose map to help define the main structure of an image. For example, the Openpose detection model can identify human poses, including the locations of hands, legs, and head. A sample edge map is shown below.
What can aiTransformer Super Stylizer do?
By combining Stable Diffusion with ControlNet, the Super Stylizer can apply styles specified by text prompts to input images while preserving their original structure. This allows the resulting image to blend seamlessly into its environment, creating a realistic and convincing final output. Following are the steps to use ControlNet to stylize an image.
First, enter the desired style prompt into the "Description of Style" input box.
Next, select one of the three ControlNet options (available for subscribers) in the "Apply The Results To My Image" dropdown list: Canny, Sketch, or Depth.
Once you have chosen your desired ControlNet option, an "Input Image" option will appear. Click "Choose File" to upload your image.
After uploading your image, you will see an option for "Style Strength (between 1 and 99%)." Choose the percentage of style strength you wish to apply to your image, with the default setting being 50%. Keep in mind that a lower style strength will preserve more of the original image, while a higher strength will apply more of the selected style.
Click "Upload to Process" to get the results.
What's the difference between Canny, Sketch and Depth?
The ControlNet Canny option utilizes the classic Canny edge detection that can effectively extract both curved and straight lines from an image. However, since it is an older technique, it may be vulnerable to noise in the image, which can affect the accuracy of the edge detection. Despite this, the results of using the Canny option are generally quite good. Additionally, it is able to nicely reproduce the bokeh effect on the background of the image.
The ControlNet Sketch option employs an advanced edge-detection technique that is designed to produce outlines that closely resemble those created by humans. This technique is suitable for tasks such as recoloring and restyling images.
The ControlNet Depth option uses depth map which is useful for conveying how far away the objects in an image are. White indicates objects that are closer to the viewer, and darker shades represent objects that are further away.
It can be helpful to see some examples to better understand the differences of the 3 options. In the following chart, the first row shows the input image and Canny, Sketch, and Depth maps extracted from it. The second and third rows give the prompt, seed and style strength along with resulting images by applying the 3 ControlNet options. To ensure a fair comparison, the same prompt and seed number are used in each method.
The ControlNet Samples Gallery
Click on the small check mark located at the top-left corner of the image to copy the prompt of a specific image to the clipboard, which can be pasted directly into the "Description of Style" input box of Super Stylizer.
Give it a try and explore the different styles and input images available. We value your feedback, so please don't hesitate to share your comments and suggestions.


Comments
Post a Comment